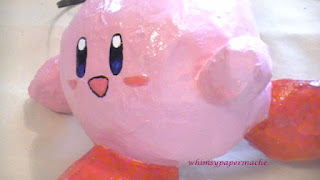
Lovable and Effortless Paper Mache Kirby
Ornament
 We
will show you how to wade up newspaper into a small ball and transform it into
a pink Kirby with big red feet.
This
paper mache project is super easy and great for someone wanting to learn the versatile
art of paper mache. Kirby characteristics such as small round body, pink color,
with large red feet and stubby arms will be easy to recreate.
This small Kirby ornament has a
awesome whimsypapermache look we
think you will enjoy so much.
Kirby Super Star, known as Kirby's Fun Pak in
Europe and Hoshi no Kirby Super Deluxe (星のカービィスーパーデラックス Hoshi no Kābī Sūpā Derakkusu?, lit. "Kirby of the Stars Super
Deluxe") in Japan. wikipedia
Quick
List
Recycled Newspaper
Masking Tap
Cardboard
Paper Mache Paste
Paints and Paint Brushes
Paper Clay (Optional)
H20 and Rags
Steps to Make Your Pink Kirby
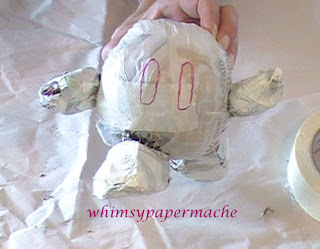
1 Build Your Armature
Begin by wading up recycle
newspaper into a small round ball for Kirby's body, and slide the ball of paper
into a plastic bag..
Using masking tape to shape your
bag and hold into place.
Arms and Feet
For his feet cut cardboard into two large oval
shapes. Wade up newspaper and place on top of the feet to create a 3D effect. Stab
wire into the foot and attach to the body. I use the wire to create motion with
his feet and arms.
For his arms wade up newspaper and tape into shape,
connect using wire or tape.
2 Paper Mache
1st
Session
Cover
the Kirby armature with 3 to 4 layers of newspaper soaked in paper mache paste.
Lay your paper flat onto your Kirby armature and work out all air bubbles. As
you continue to apply layers of paper your Kirby will begin to take shape
before your eyes.
Once
you have covered Kirby with paper mache he must completely dry
before adding more wet paper mache.
Check
for soft spots or weak areas if you do not find any then you can move on to
priming and painting. If you need to add more layers and usually I find for a sturdy
piece of paper mache you will need to add a total of estimated 8 layers.
2nd
Session
Paper Mache: Cover with 3 to 4
more layers of paper mache all at one time. Let it completely dry before moving
on to paint.
Check
Kirby for soft spots and if Kirby does not seem strong enough you can add more
paper mache layers and paste. After each session of paper mache your Kirby must
completely dry. The size of your Kirby will determine how long it will take to
dry.
Quick Link to Paper Mache Paste
Recipe: http://goo.gl/BH5lgM
If you need once Kirby has dried you can lightly sand with
sandpaper and wipe off before painting.
3.
Paint Kirby
Paint a white coat of primer paint
onto Kirby to give a white canvas for painting. We use white flat interior
house paint from the Family Dollar to prime our sculptures.
Once
the base coat as dried paint with layer of acrylic paints. Kirby has
distinctive oval shaped eyes that are white at the top, black in the center and
dark blue on the bottom and rosy cheek-blushes near his eyes.
Let all you painting completely
dry before sealing with varnish.
You must seal your paper mache
pieces with varnish for protection. Varnish comes in a can in gloss or stain to
apply with a brush or spray can apply 3 to 4 coats and let it dry.
Follow the instructions on your
varnish to apply. We use Polycrylic Minwax at the studio to seal all our art.
Kirby Wrap Up
This is just one way to make a Kirby
ornament; we would love to hear your thoughts and see your paper mache Kirby's.
Thank you for stopping by the
studio please subscribe before you leave and have a great day.
Connect
with us:
https://www.instagram.com/madeavesdropping/(Artist Madison loves
music too!)
YOUTUBE
© whimsypapermache.com 2015

