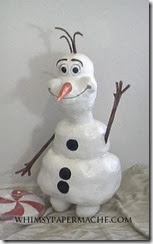
“Hi, everyone. I'm Olaf and I love warm hugs!”
Olaf is Disney's new animated character from "Frozen", he is a delightful little guy that will warm you heart. My daughter and I wanted to make our Olaf before summer so he could finally enjoy the warmth of the sun, picnics, and flowers. You'll just have to watch the movie….
Whimsical Paper Mache Olaf Snowman Tutorial
Creating a paper mache Olaf is not a good beginner project if you have never used paper mache to sculpt before. If you want to start here then by all means do just don't expect to create your first master piece in a day.
Start by creating each of his separate body parts using recycled newspaper, magazines, trash, or whatever.
You will take the newspaper for each shape needed; crumple the newspaper into balls and stuff into a plastic bag. You will be shaping as you go, use to tape to hold your shape in place.
For a second option you can also start with boxes for his body and round them out with newspaper. Slide that into your plastic bags for adding layers of paper mache strips.
Olaf's Armature Melted Down Into Easy Steps
Let's take a look at each of Olaf's body parts and see if we cannot recreate him from our recyclables. I will do the best I can to explain how to create this Olaf.
I suggest you start at the bottom and work your way to his head. The head takes the longest to shape.
Head
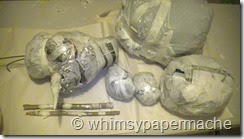 Olaf's head is an exaggerated tear drop shape (almost diamond) that is roughly the size of his two part body. We will form his head by crumpling up newspaper and stuffing into a plastic bag. Take tape to create a small cylinder shape at the smallest end of the tear shape. On the opposite end squeeze and tape off into a bowl shape. Please refer to picture and video.
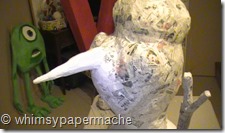
Pinch, crumple and add paper to build the cheeks up as necessary to hold his nose. You can cut cardboard into a rectangle shape roughly 1 inch under his nose for a tooth, giving him an over bite look. (Or add with clay later).
Twigs for hair (wire, twigs, whatever).
Nose
Olaf's nose is a carrot you can pick up a plastic carrot to reshape into the carrot we need. Or you can shape by crumpling newspaper taking that and roll up into a sheet of newspaper. His carrot nose is much thicker near the face with an obvious hump to it.
Snowball Torso
Marshmallow shapes by crumpling up newspaper and stuffing into a plastic bag.
Stick Arms and Hands
Stick the small twigs into the sides of the top part of the body for the arms and stick 3 small twigs atop his head for hair. (Twigs, tp rolls, rolled newspaper, clothes hanger)
Marshmallow shapes by crumpling up newspaper and stuffing into a plastic bag.
Snowball Feet
Create two little marshmallow shapes by crumpling up newspaper and stuffing into a plastic bag. His two feet are roughly the size of his middle torso.
Paper Mache Your Olaf Armature
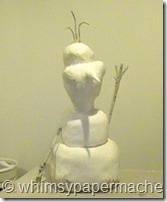 Now that you have all your body parts created it is time to assemble your armature with paper mache. We have short video demonstrating how to paper mache if you need.
When sculpting anything I cover my armatures with paper mache then I recover cover with a 1/4 inch layer of paper clay. So that is what I have shown you in the how to video, if you have not watched the video please do, it might help me explain my process. Remember I am not a teacher, just an artist hoping to share with you. There are many ways you can do this none are wrong, just don't give up keep creating.
Cover your entire armature with 3 to 4 layers of paper mache paste and set it aside to dry. It will take over night to dry or sitting it in the sun for 6 to 8 hours, at least.
Once your armature is dry you can continue using the paper mache strip method by adding 10 to 15 more layers on your armature or cover your armature with paper mache clay.
Paper Mache OR Paper Clay
 The clay recipe is on our site for your convenience. Cover with 1/4 inch layer all over your armature except his arms and twig hair. Cover those parts with a total of 8 layers of paper mache strips. If you find they are not sturdy enough for your liking, add more paper mache strips.
Work in small steps; don’t try to create everything in one sitting. A few layers of strips or a small thickness of clay dries fast, so do a little, let it dry then keep adding.
Give yourself time to learn the way that mache works, if you have never worked with paper mache before don’t expect to complete your first masterpiece in one day.
Once your armature is completely covered and dry lightly sand as needed. Then use gesso to prime your Olaf for painting, you may need to sand a little after the gesso dries.
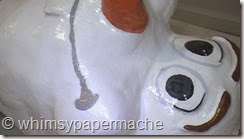 Now cover your Olaf with a layer of white paint for his cute little snow body. Add his expressive face you can refer to your favorite picture of the little character.
Once your snowman is painted cover with 3 to 4 layers of polyacrylic to seal and protect your Olaf.
Olaf is not weather proof and will need to stay inside so he will not melt. I do hope that you have a general ideal how you can now take what I have shared and create your very own Olaf.
Thank you for stopping by the studio please hit like, and subscribe before you leave.
Have a great day.
