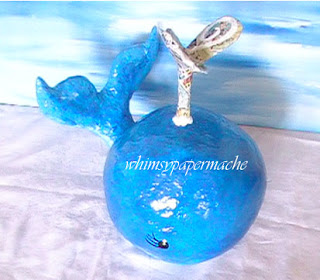
Lovable and Effortless Paper Mache Whale
We will show you how to wade up newspaper into a big ball and transform it into a beautiful big whale with a unique blow hole.
This paper mache project is super easy and great for someone wanting to learn the awesome art of paper mache.
We will add a few whale characteristics such as their streamlined form, an insulating layer of blubber, blow hole and tail flukes.
These little whales have a awesome whimsypapermache look we think you will enjoy so much.
The story of Jonah and Whale: “Jonah”─a story of God’s mercy and compassion. Sometimes all someone needs is another chance. Learn the story here: http://www.cbn.com/tv/2448326520001
Quick List
Recycled Newspaper
Masking Tape
Cardboard
Paper Mache Paste
Paints and Paint Brushes
Paper Clay (Optional)
H20 and Rags
Steps to Make Your Big Whale
1 Build Your Armature
Begin by wading up recycle newspaper into a tear shape ball creating a narrow end to use as your whale tail.
Using masking tape to shape your bag of newspaper into whale blubber and create a steam line look to the tail flukes. Shape with lots of mashing tape.
Tail Flukes
Cut cardboard into the S fluke shape curves and tape on top of your rolled up
Blow Hole
Roll an empty tp roll into a coil, tape to hold, and hot glue into place on top of your lovable whales.
Water
Cut cardboard into a water drop and glue on top of your water spout.
2 Paper Mache and Paper Clay
1st Session
Cover the big whale armature with 3 to 4 layers of newspaper soaked in paper mache paste. Lay your paper flat onto your whale armature and work out all air bubbles. As you continue to apply layers of paper your whale will begin to take shape before your eyes.
Once you have covered your big whale with paper mache they must completely dry before adding more wet paper mache or paper clay, which ever you wish to use.
Paper Clay or Paper Mache
You Choose
2nd Session
For this session of covering your apple you have two choices; paper clay or paper mache. Both mediums are wonderful and will render a perfect apple. The 2 best benefits to using the paper clay vs. paper mache is time and durability. Both recipes are on the channel; feel free to check them out.
Paper Mache: Cover with 8 to 9 more layers of paper mache all at one time. Let it completely dry before moving on to paint. If your big whale does not seem strong enough then you can add more paper mache. After each session of paper mache your armature must completely dry before moving to your next step. Quick Link to Paper Mache Paste Recipe: http://goo.gl/BH5lgM
Paper Clay: Cover the entire big whale with 1/4 inch layer of paper clay and let that completely dry before painting. Using the clay is a time saver for the studio and we love working in the handmade clay. Apply with your hands and smooth with paper mache paste. You can let your clay sit for about 4 hours or so and go back over with the paste for a smoother finish.
The size of your whale will determine how long it will take to dry. A large whale will take 3 to 4 days to dry. You can use a fan, sit in the sun, and place in the oven on the lowest temperature it will allow. My oven can go as low as 145 degrees, which is a perfect temperature for slowly drying your paper clay. If you heat your clay to fast it can cook and turn dark brown.
Paper Clay Recipe: http://goo.gl/xoTFbJ
Question: Can I skip the paper mache and put paper clay directly onto my armature?
Answer: Yes, if your armature can support the weight of the paper clay without the support of the paper mache strips and paste.
If you need once the big whale has dried you can lightly sand with sandpaper and wipe off before painting.
3. Paint Your BIG whales
Paint a white coat of primer paint on your whale to give you a white canvas for painting on. We use white flat interior house paint from the Family Dollar to prime our sculptures.
Once the base coat as dried paint with acrylics anyway you like. Let all you painting completely dry before sealing with varnish.
You must seal your paper mache pieces with varnish for protection. Varnish comes in a can in gloss or stain to apply with a brush or spray can apply 3 to 4 coats and let it dry.
Follow the instructions on your varnish to apply. We use Polycrylic Minwax at the studio to seal all our art.
Whale Wrap Up
This is just one way to make a big whale; we would love to hear your thoughts and see your paper mache whales.
Thank you for stopping by the studio please subscribe before you leave and have a great day.
If you would like suggestions to create smaller whale this article is for you. How to Make Little Whale Ornaments: http://goo.gl/Ip5kn3
Connect with us:
YOUTUBE


