Easy Homemade Dough Clay
Dough Art, also known as "Salt Dough", is the answer for people looking to experiment with modeling clay on a budget. Through this simple homemade recipe, you will increase your creativity while modeling, sculpting, and painting.
This dough recipe is nontoxic, inexpensive, and simple to use.
You will have so much fun while kneading, squishing, rolling, flattening, poking, squeezing, and treading your dough clay.
Dough Clay Recipe
4 cups of plain white flour (regular non-self rising)
2 cups of table salt
Approximately 2 cups of warm water
Mix flour and salt with a fork in a large mixing bowl, then add most of the water. Using your hands, mix your dough fairly stiff for molding. This recipe makes approximately 4 ounces. To make smaller amounts cut this recipe in half.
If it seems too stiff add more water.
If it gets too soft you can knead in more flour.
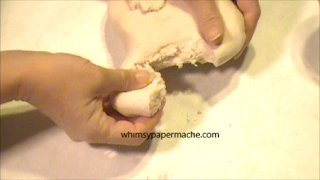
As soon as the dough holds together, turn it out on the table top and knead until it is smooth and pliable; approximately 5 to 7 minutes.
If it gets sticky add more flour to your hands.
Store your dough in an air tight container in the refrigerator and use the dough clay within 4 to 5 days.
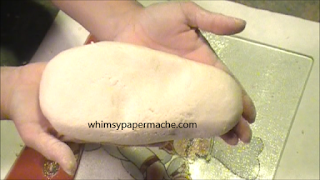
What Your Dough Should Look Like
Getting the dough the right consistency is important, and is something you have to learn by "feel". It feels a lot like working with cookie dough. Your dough should not crumble or crack apart in your hands, nor stick to your hand. Your dough will have just the right moisture for perfect pliable dough.
After kneading (pound, roll and pull), place the dough clay not being used in a container or plastic bag to prevent drying out while you are creating with dough clay.
Following this recipe, your dough will turn out as perfect pliable dough clay. The more you practice making the dough clay the better you will get.
It is best to use your clay up within 4 to 5 days. Depending upon your location you may need to add more flour into your dough if it gets sticky.
It is best to mix up a new patch of clay if you feel the clay dough has kept for too long.
You can split the dough into several sections, and then add a different color of food coloring to each, so that the kids will have several colors from which to choose. Or, the dough designs can be painted and decorated after they're finished.
Drying Your Clay Art
Baking
After designs are assembled bake at 200-250 degrees for about 2 hours. This is an average time for most shapes, but cooking time may vary due to size and thickness of designs.
Dough must be baked until it is solid hard all the way through, such that when pressed with finger, there will be no softness or "give".
You can put some aluminum foil of the top of it to keep it from browning, but if you are going to paint it, it doesn't really matter if it is going to brown or not.
On larger pieces poke tiny pin holes in the thickest part to release air pockets. Watch out for puffing while baking your thicker designs; try to keep it less than 1/2" inch for better results. You can try baking one for experiment before baking all of your designs.
Air Drying
Air drying takes a long time, so I usually make sure the pieces are not too thick. Lay the sculptures on baking paper to dry, not foil.
Keep in mind that air-dried salt dough is more fragile than baked dough. Also, when air drying dough clay, your sculptures will shrink a little; therefore, you will want to exaggerate each feature slightly.
You may want to check out these free how to dough clay workshops:
Thank you for stopping by the studio and we hope to see you again real soon.
© whimsypapermache.com


